Creating an image with your code
Here you will learn how to leverage your own image (libraries, code etc) to execute batch and interactive analyses.
Example: Latinos framework
This section describes the creation of a docker image with Latinos software as an example to bring your own image into the facility workflows. Latinos is a software stack to allow analysis of CMS data in final states with at least one lepton. It is a legacy framework, based on "traditional ROOT". The code resides here. What is described in the following is just one way of achieving the goal of building the image, probably one of the most straightforward and best documented. It is entirely based on the instructions here.
Requirements
The only requirement is that the image has to be derived from ghcr.io/comp-dev-cms-ita/jupyterlab:AF20-alma9-v0.0.5.
Placing the software on gitlab to use CI/CD pipelines
A CI/CD (Continuous Integration/Continuous Deployment) pipeline is a gitlab funtionality which allows defining a set of steps that need to be run following a commit or a merge request. We will use it to create the relevant docker image.
As a first step the Latinos repository was cloned on gitlab.cern.ch, to be able to use CI/CD pipelines. A few additions were necessary:
- a
.gitlab-ci.ymlfile instructing the creation of a pipeline to build the software. In essence, on every new commit, gitlab runs the pipeline, which, if succesful, results in the creation of adockerimage of the latinos software stack. One of the most relevant lines of the pipeline configuration is the specification of the starting image, i.e. the one on top of which the software is built. In this case it was the already mentionedghcr.io/comp-dev-cms-ita/jupyterlab:AF20-alma9-v0.0.5, so that the resulting image has the same functionalities of the original image, especially the capability to handle the Analysis Facility HTCondor cluster. - a
.gitlab/SetupDocker.shholding the instructions to build the software. In this case the software is built in aCMSSW_11_2_5developer area inside/opt. The job on the worker node will need tocd /opt/CMSSW_11_2_5and issuecmsenv.
After every commit the pipeline is triggered and the docker image ends up here.
Propagating the image to /cvmfs
Adding the images to /cvmfs is easy, using unpacked.cern.ch, following instructions here, which ultimately boil down to make a merge request like this one.
Every night the images are propagated.
You will eventually be able to find your image in /cvmfs/unpacked.cern.ch/ path.
N.B. For testing purpose we can provide you with a dedicated repository in case you find any trouble with unpacked one.
Using your own image in the Analysis Facility services
Using your image for HTCondor jobs
You can find an example on how to use your image within HTCondor jobs in this tutorial
Using your image from terminal
You can then use singularity CLI to load a session on your image stored on cvmfs. The command would look like:
singularity run /cvmfs/unpacked.cern.ch/MYIMAGEPATH bash
N.B. please look at the singularity documentation for details on all the available options
Loading a notebook kernel for your interactive analysis
- First of all, open the kernel editor plugin

- Edit the singularity kernel clicking on the edit icon
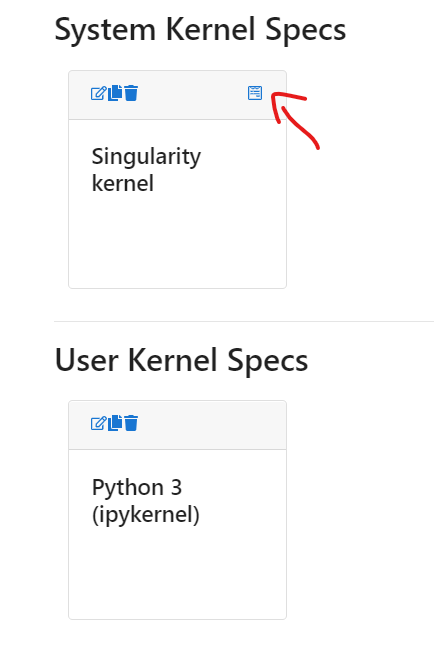
- When prompted, indicate the path to your image and click on save
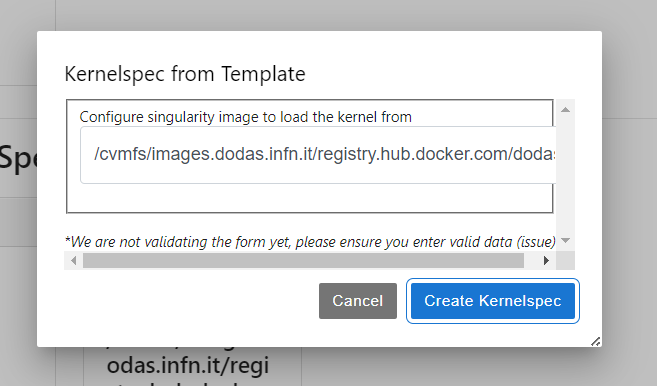
- If everything went well, you can now see a new icon appearing in the lauch menu

You are now ready to use that kernel for your analysis.
Using the image on DASK worker nodes
You can find an example on how to use your image for the DASK worker nodes in this tutorial